Stardew Valley is a game all about farming and one core part of that is barns. Barns are great additions to the farm and allow players to keep and take care of barn-dwelling animals. If you’ve read our article all about barns you’d know that there are three types of barns in Stardew Valley: Barn, Big Barn, and Deluxe Barn. Today we want to focus on the Big Barn for you.
How to get a Big Barn
Like all types of farm buildings in Stardew Valley, the Big Barn can be purchased from Robins Carpenter’s Shop just north of town. Because the Big Barn is not a standalone barn it cannot be purchased straight away. The Big Barn is an upgrade of the original Barn which means that you need to have a Barn built on the farm before you can ask Robin to upgrade it to be a Big Barn.
Big Barn Costs
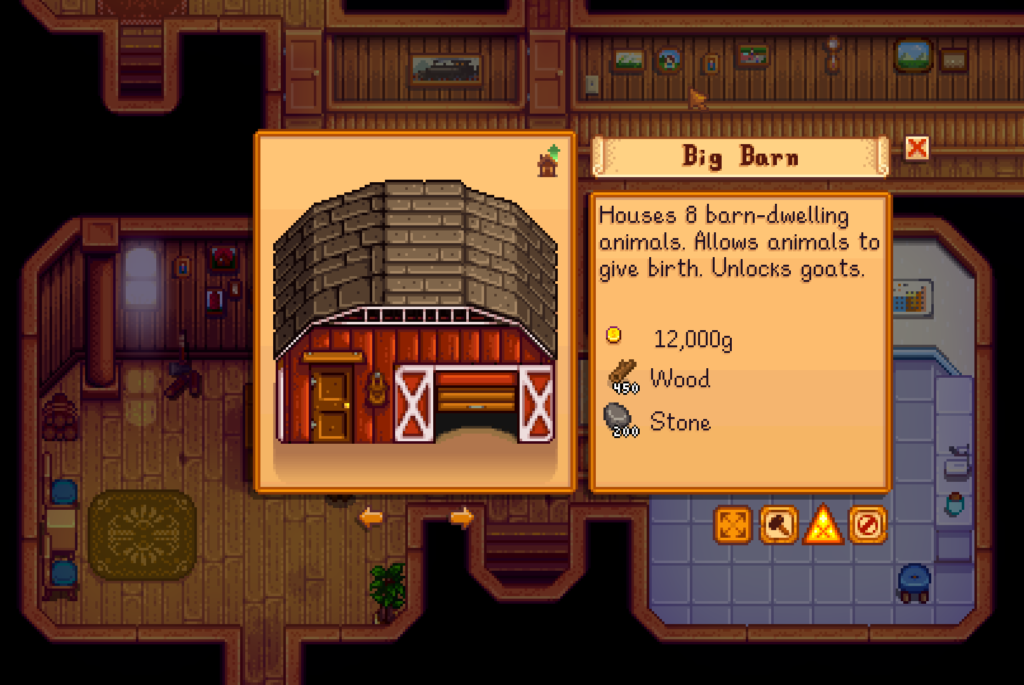
While the Big Barn itself may not seem like too much, it’s certainly expensive. To begin, the Big Barn costs 12,000g, 450 wood, and 200 stone which seems easy enough, until you start to realize that to build a Big Barn you first need to have the basic Barn. This barn costs 6,000g, 350 wood, and 150 stone which means that in total you need 18,000g, 800 wood, and 350 stone to build the Big Barn. Plus the materials for the silo if you plan to store hay for the winter. It costs 100 gold, 100 stone, 10 clay, and 5 copper bar(s). Time-wise, Robin will take 3 days to build the Base barn and two days to upgrade it to the Big Barn (Remember that Robin does not work on holidays so plan accordingly).
Why get a Big Barn?
Even though it may seem daunting to save up the money and materials necessary to purchase the Big Barn Upgrade, it’s totally worth it for so many reasons. For instance, its space increases, it can hold more types of animals and has one extremely important special feature that changes the way you play Stardew. Overall, the Big Barn pays for itself in no time at all thanks to these features.
Space
Let’s talk about space first, the Big Barn Upgrade doubles its animal holding capacity from 4 to 8. In order to accommodate the extra animals the Big Barn also increases its interior by about 25%. This means that it gains one extra window inside and has an animal feeder that’s 8 spaces long instead of the original 4. While all of this space may seem like a great thing, many new players might ask themselves “Well if it’s that much bigger, then how do I fit it on my farm?” If you found yourself asking that question then I have great news for you, even though the Big Barn appears larger inside and can hold more animals, the outside of the barn stays exactly the same as it was originally and only takes up a 7×4 area which is only 28 farm spaces!
Animals
With the Big Barn upgrade you will be able to store more barn animals than ever! After unlocking the upgrade you get the ability to purchase both cows and goats from Marnie at Marnie’s Ranch and you can even hatch an ostrich too! Taking care of animals and making animal products is one great way to make money in Stardew Valley and it’s a key gameplay mechanic too. New players may find themselves confused about how to take care of animals and even how to get animals. The rest of this guide is focused on getting animals and how to maximize your profits with them.
How to Get Animals

Cows are one of the first animals obtainable in Stardew Valley. Marnie will sell you one cow for 1,500g at her ranch just south of town. Similarly, she will sell you a goat for 4,000g as well. Though the cow is unlocked the moment you build a basic barn, the goat will only become purchasable after having a completed Big Barn Upgrade. If you are looking to purchase a pig, or sheep, unfortunately, you will have to wait for the deluxe barn upgrade. Although the cow and goat can be purchased from Marnies Ranch, the Ostrich is a special animal that requires a few steps to obtain.
Animal Care
Have you ever right-clicked a barn animal after petting it? If not, let me help explain how it works. After you right-click on your barn animal, a small screen pops up with your animal’s name, age, friendship rating, and mood. In order to get higher-quality products from your animals, you have to maintain a good friendship rating and mood.

Animal Friendship
Every barn animal you purchase or gain through pregnancies will start out at zero hearts. These hearts represent your friendship rating. Every half hart is 100 friendship points, giving you a total of 1000 friendship points each pet can get. Your friendship rating with your pet helps decide if your animal can produce higher-quality items and, if it can, how often it will happen.
Things that affect the friendship rating positively are:
- Petting your animal gives you a base amount of +15 to your friendship rating. If you become a shepherd or coopmaster and you are petting an animal of the relevant type, then you will get +30 to your friendship rating.
- Milking/shearing your animal gives you +5 to your friendship rating. Luckily there is no penalty if you forget to milk or shear your barn animals.
- Eating grass outside in the fields gives you +8 to your friendship rating. (Tip: Letting your barn animals eat grass also keeps them from eating the hay, and helps save on food costs.)
Things that affect the friendship rating negatively are:
- Not petting your animal can give you -5 to -10 friendship rating. You will lose fewer friendship points if your friendship rating is already high.
- Being trapped outside overnight will give you -20 friendship points. (Tip: On your farm buildings, there are doors that you can open or close to allow your animals to enter or exit. If these coop or barn doors are closed, your animals can’t return.)
- Not being fed will give you -20 friendship points.
Mood
Same as friendship, an animal’s mood helps determine if the animal product is regular, silver, gold, or Iridium quality. Instead of points like friendship, mood has a value from 0 to 255. You can determine where your animal’s mood is through the text on their dialogue box that pops up when you right-click them:
- If it is happy, that means its mood is at least 200 and at most 255.
- If it is fine, that means its mood is at least 30 and less than 200.
- If it is Sad, that means its mood is at least 0 and less than 30.
Things that affect the animal’s mood positively:
- Eating grass outside will set their mood to 255.
- Petting your animals will give them +32 to +36 to their mood depending on which animal it is. Double that if you have the shepherd or coopmaster profession and you are petting the animal relevant to that profession.
- If your animal is fed then it will get +4 to +16 depending on which animal it is and if they ate hay or grass.
- If the animal is outside between the hours of 6 and 7 pm with a mood value is less than 150, then its mood value will go up +4 to +8 every 10 minutes. (Will not stack)
- During the winter if you are using a heater and your animal has a mood value is 150 or more, then its mood value will go up +4 to +8 every 10 minutes between the hours of 6 pm and 2 am if the player is awake. Just be careful since you will pass out as soon as the clock strikes 2 am. (Only one heater is required)
Things that affect the animal’s mood negatively:
- If your animal is left outside in the rain, or during the winter when it is cold, then its mood value will give you -4 to -8 to its mood value every 10 minutes. It will only stop once you let the animal back inside. (Does not stack)
- If you leave your animal outside past 7 pm, then its mood value will give you -4 to -8 to its mood value every 10 minutes. It will only stop once you let the animal back inside. (Does not stack)
- If you leave your animal outside all night then its mood value will take half of whatever its mood value was.
- If you don’t pet your animals at all that day, then their mood value will give you -20 to -40 to its mood value depending on the animal.
- If you forget to feed your animals, then their mood value will give you -100 to its mood value.
Obtaining an Ostrich
In order to get an ostrich in Stardew there are a few key steps. First, you need to have unlocked Ginger Island by completing the community center and talking to Willy. He will ask you to repair his boat for 5 iridium bars, 5 battery packs, and 200 hardwood. After doing so, you will be able to travel to and from Ginger Island. The next step is to find and complete journal Scrap #10. After completing Journal Scrap #10 you will find the Ostrich Egg (Alternatively, you can find the egg as a random drop from chests in the volcano dungeon). The egg itself can be sold for anywhere from 600-1,200g depending on the quality. It’s important that you DO NOT sell this egg! Saving the ostrich egg is important as you need to incubate it in order to get an ostrich in the barn. The Ostrich Incubator is a piece of equipment that allows players to hatch ostriches, it’s recipe is unlocked after completing the fossil collection on Ginger Island. To get the recipe, simply finish the fossil collection and speak to Professor Snail at the Island Field Office.
Incubating an Ostrich

Now that you have an ostrich egg you need to incubate it. Incubation takes 9d 10h to hatch an ostrich unless you have the coopmaster profession in which case it will hatch in only 4d 18h and 20m. Simply right-click the machine while holding an ostrich egg to begin the incubation process and eventually, an ostrich will pop out!
Animal Products
Each animal in Stardew has its own unique set of products. Cows and goats both produce types of milk, and ostriches will produce an ostrich egg. Let’s get into the nitty gritty of these specifics though. Starting with cows which will produce one jug of milk daily. In order to milk a cow you first need a milk pail which can be purchased from Marnie for 1,000g. Cows have two types of milk: “milk” and “large milk”. Milk will sell for between 125-250g depending on its value and “large milk” will sell for anywhere between 190g and 380g based on its value as well.
Cow Products
Depending on your level of friendship with your cows they have a chance to produce either a regular milk or a large milk each day. Normal milk in Stardew can sell for anywhere between 125g to 250g depending on its quality. Large milk can sell for anything from 190g to 380g. While milk is a great way to make money off of your cows, you can make much more cash by simply making a cheese press. Using the cheese press you can turn any milk into a cheese. Cheese is an artisan good that sells for 230g when it’s unaged and up to 560g when it’s aged in a cask. (Please see the charts below to see the specific prices for each quality of cow product).
 |  | |
| Item | Milk | Large Milk |
| Sell Price | 125g 156g 187g 250g | 190g 237g 285g 380g |
| Sell Price w/Rancher (+20%) | 150g 187g 224g 300g | 228g 284g 342g 456g |
| Normal Quality | Silver Quality | Gold Quality | Iridium Quality | |
| Sell Price | 230g | 287g | 345g | 460g |
| Sell Price w/Rancher (+ 20%) | 276g | 344g | 414g | 552g |
| Sell Price w/ Artisan (+40%) | 322g | 401g | 483g | 644g |
| Cask Aging | No Aging | Aged for 3d | Aged for 7d | Aged for 14d |
Goat Products
Similar to cows, goats also produce milk however rather than giving you milk every day, goats can only be milked once every other day. Depending on your friendship with the goats you can get either “goat milk” or “large goat milk”. Goat milk will sell for anywhere between 225g and 450g based on its quality which is similar to the large goat milk which will sell for 345g to 690g depending on the quality as well. Just like with cow’s milk, you can use a cheese press to produce goat cheese which can be aged in casks to increase its value. Goat cheese can sell for anywhere from 400g to 800g and is one of the easiest animal products to make! (All of the items can be seen in the charts below for specific prices and information).
 |  | |
| Item | Goat Milk | Large Goat Milk |
| Sell Price | 225g 281g 337g 450g | 345g 431g 517g 690g |
| Sell Price w/Rancher (+20%) | 270g 337g 404g 540g | 414g 517g 620g 828g |
| Normal Quality | Silver Quality | Gold Quality | Iridium Quality | |
| Sell Price | 400g | 500g | 600g | 800g |
| Sell Price w/Rancher (+20%) | 480g | 600g | 720g | 960g |
| Sell Price w/Artisan (+40%) | 560g | 700g | 840g | 1,120g |
| Aging | No Aging | Aged for 3d | Aged for 7d | Aged for 14d |
Ostrich Products
The final type of animal product we will discuss is ostrich products. Ostriches will produce one ostrich egg each week, although this may not sound like much, it’s absolutely worth the wait. One ostrich egg sells for anywhere between 600g and 1,200g based on its quality. However, if you have a mayonnaise machine you can put a single ostrich egg inside of it to get 10 jars of mayonnaise of the same quality. This means that you can place one gold-quality ostrich egg in and get 10 gold-quality jars of mayonnaise. (See the charts below for specific pricing information on ostrich eggs and mayonnaise).
 | |
| Item | Ostrich Egg |
| Sell Price | 600g 750g 900g 1,200g |
| Sell Price w/Rancher (+20%) | 720g 900g 1,080g 1,440g |
| Normal Quality | Silver Quality | Gold Quality | Iridium Quality | |
| Sell Price | 190g | 237g | 285g | 380g |
| Sell Price w/Rancher (+20%) | 228g | 284g | 342g | 456g |
| Sell Price w/Artisan (+40%) | 266g | 331g | 399g | 532g |
Special Features!
Big Barns come equipped with the original features of the Hay Hopper and the Feeding Bench. If you chose to build the silo, you will be able to pull your hay from the hay hopper and place it on the feeding bench to feed your barn animals. This saves space, time, and lots of extra walking when taking care of your barn animals. Once you are able to upgrade to a deluxe barn, your job will become easier with an auto-feed system. We expand more on that topic in our deluxe barn article.
The big barn has one important special feature that has absolutely changed the way I play Stardew Valley. That special feature is animal pregnancies. I know that may not sound all that exciting to new players but it’s an extremely important feature to have. We discussed the cost of farm animals earlier and if they seemed expensive to you it’s because they are. This feature get’s around that cost though and allows you to add animals to your Big Barn for next to nothing.
Animal pregnancies work like this; First, you need at least one animal in your Big Barn that has not given birth before, there needs to be open spaces in the barn for the baby animal to take up, and also make sure that you have not blocked pregnancies for any of your barn animals. After that, there is a 50% chance each night that one of your barn-dwelling animals gives birth to a new baby. This means that so long as you spend the money on only one to two animals, then you can fill up the Big Barn’s 8 total spaces in less than one Stardew season.
Breeding for Profit?
After gaining the ability to breed animals some people may ask the question, “Why don’t I just sell these guys?” While that seems like a great idea at first, it’s quite a complicated process. To begin, animals only have a 50% chance to give birth each night which means that there is no guarantee you will have an animal to sell the next day. Not only that but, animals only sell for a slightly higher price than they are purchased for. Take cows for example, one cow can be sold for a maximum price of 1,950g. In order to get that price however you need to max out your friendship with the animal which takes quite some time. So, while selling animals may sound like a great way to make some quick cash in Stardew, it’s probably better to just love the animals you have now as the products they provide you will make you more gold in the long run.